Showing posts with label Baking. Show all posts

Friday, September 27, 2013

Wedding Cake

Hello!!!  I am finally back :0}  
The wedding was a total success and I managed to get out of there without ruining my mascara!  

I made it through the ceremony fine cause I was too worried about the cake to really think about my baby brother getting married.  After that I thought I was scotch free from tears until I caught sight of the slide show of so many baby pictures.  I am six years older than my little brother, and while I am not sure he remembers me taking care of him, I remember watching over him like he was my own little guy.  The slide show was just a primer though for the mother-son dance where the real waterworks began.

It finally dawned on me that the little guy, the one I played with in the wading pool and the kindergartner I dressed before school, the nerdy little book worm that always made me laugh with his crazy dry humor, that little kid was gone.  In his place was a grown man, pledging the rest of his life to the first girl I have ever seen him truly googly-eyed over.  

What a sweet day.

I was super excited to make their wedding cake...or should I say wedding cakes.

I made one three tiered wedding cake, frosted with fondant and decorated with fondant flowers and bridal lace.  But before that...

I spent an entire week baking and frosting 250 mini-three-tiered wedding cakes.  In all honestly, I didn't really think I could do it :0}  I was determined to die trying though.  The individual wedding cakes were pretty important to the bride, my new sister-in-law {LOvE IT!} so I just kept telling myself we HAD to make it happen.  

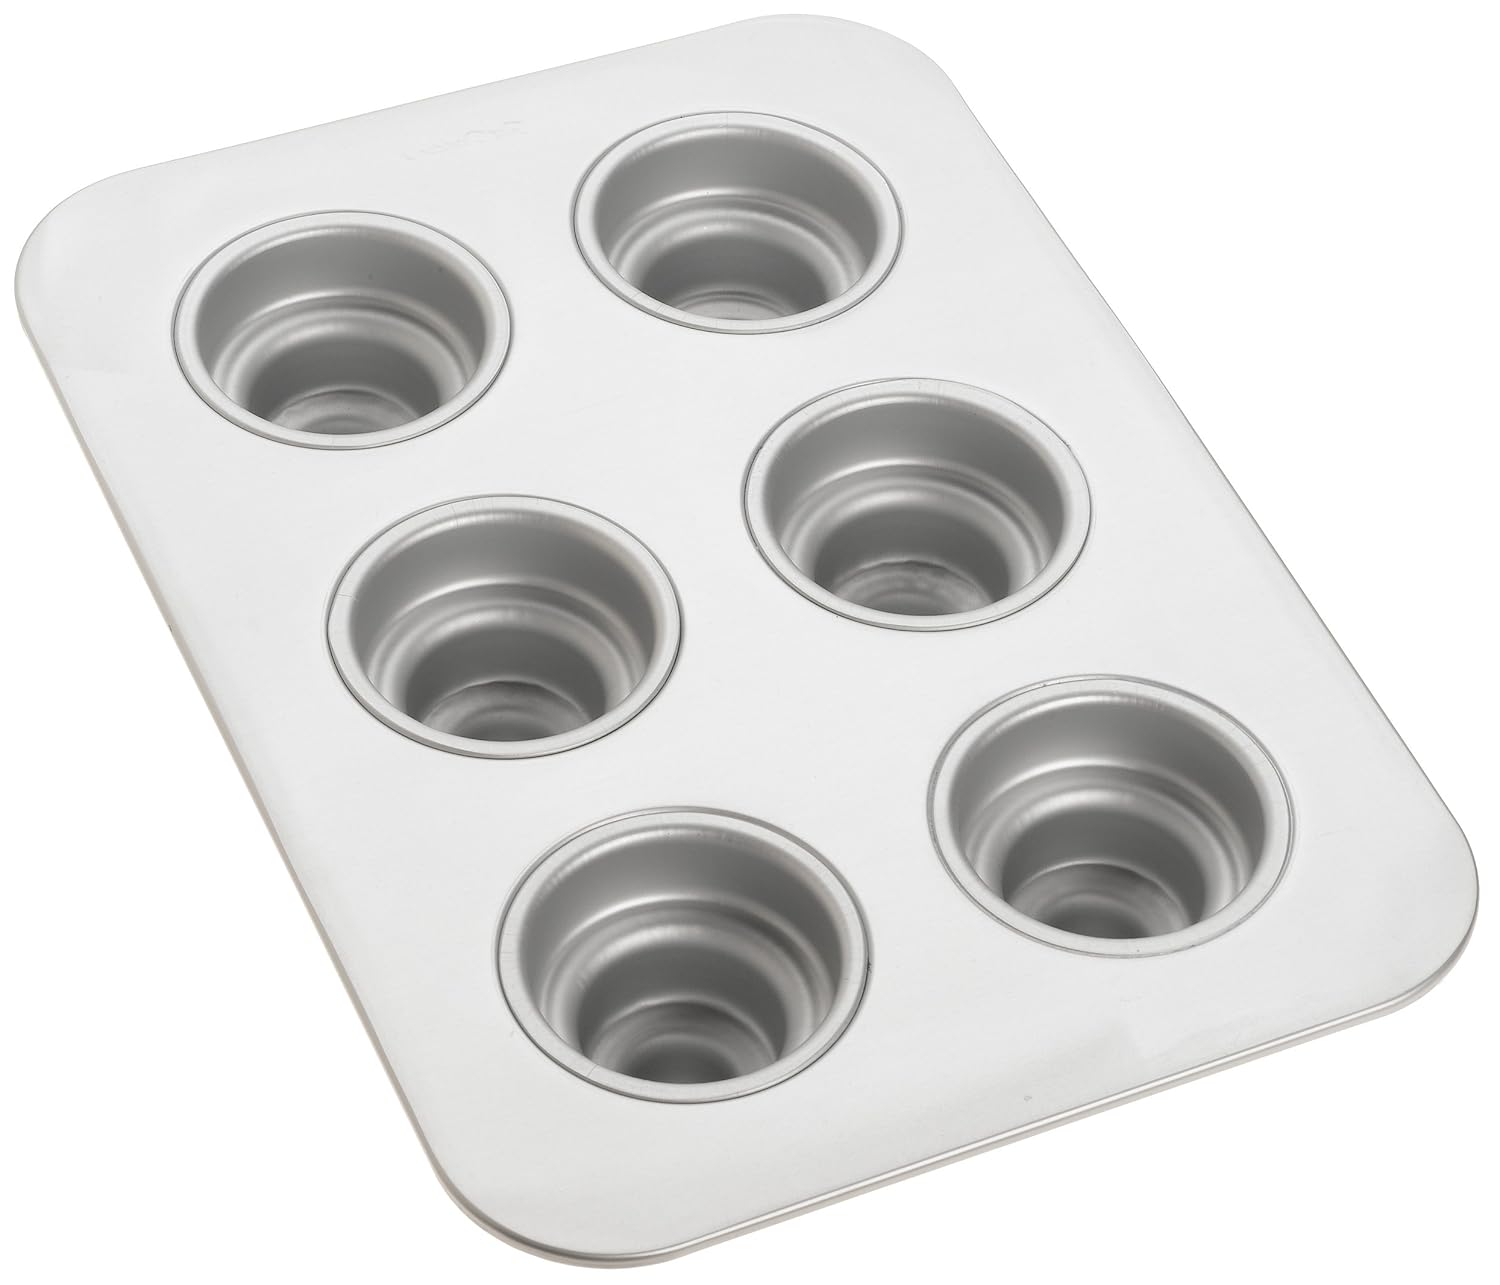
I purchased Fat Daddio's 6-Cup Individual 3 Tier cake pans on Amazon for $24 each.  At first I just bought one to make sure it would work and the cakes would come out OK, and then I went back and ordered three more.  In all honesty, with 250+ cakes to make, I wish I had ordered 6!  

One cake mix made about 14 cakes.  I baked two pans at a time in the oven using my altered cake mix recipe and baking the cakes for 25 minutes at 325.  Over two days I think I made about 25 batches of 12 cakes, each baking for almost a half hour.  It literally drove me crazy.  Luckily a friend dropped by for about two hours and babysat the cake process so I could get a break and get some last minute wood cut, otherwise I don't know if I would have made it.

I made a french vanilla cake with raspberry filling, an almond cake with almond cream filling, and a chocolate cake with chocolate ganache topping.

To fill the mini cakes, I just cut the bottom tier off, smeared on a Tablespoon or two of filling and replaced the removed portion of cake.  It worked like a charm.

Backing up to the baking portion again, it was torture.  If I could deter you from making any more than 12 of these darling little cakes I so would.  If you are crazy like me and decide you really must make these wedding cakes for all of your guests...first, tell yourself no...and if that doesn't work, email me.  I will try to talk you out of it :0}  Lastly, get ready for some labor.  

With each batch, I would grease the pans {more on that later}, mix the batter, fill the pans, put them in the oven, take the finished set of cakes out of the other set of pans, cut any excess cake bump off the bottom so they would sit flat, dump them on a cooling rack, wash each and every tier of the three tier cake pans for every cake spot, then dry each and every layer, then grease each and every layer, then transfer the baked cakes to boxes for storage, and then fill the next set of cake pans and start all over again.  I think typically I had about three minutes between batches to sit while I waited for the timer to go off and getting up to start all over again.  NOT FUN!

The next hurtle was frosting them.   I managed to round up three unsuspecting friends to come help frost as well as four family members to come intermittently through the first day of frosting.  We managed to get two flavors frosted in the first 12 hour day of frosting and filling.  The second day was just as long.  MORE TORTURE!  I made the vanilla and raspberry cake with squarish swirls, then pushed some edible pearls into the centers of the swirl to make it look fancy.  The almond cake was frosted in a messy style with a whipped frosting {delicious!}, and by the time I got around to the chocolate cakes I was totally tired of frosting!  Finally after a few failed attempts at different designs, I threw the towel in and ran to the store for the ganache ingredients.  

Mono-Board Silver, 3-1/4 Round with Tab, Box of 500 Pieces
We put the cakes on cardboard cake circles {ordered from HERE-the only place I could find them...make sure to get the circles with the tabs!!!}  You just put a dab of frosting on the cake board, then put your cake on top.  The frosting keeps the cake from sliding around during transport or while plating the cakes.  VERY IMPORTANT the frosting is.

I think I have stayed up a little too late tonight getting these pictures on here, so I am certain I am leaving out important information.  Just be sure to comment below or email me if you have any questions.  I would be glad to share anything I know if it will help you out.

Oh yeah!  Frosting!  I bought some five gallon buckets of frosting from Sam's Club.  I have been told that Costco will sell theirs, but I haven't found a Costco that would sell it to me.  I bought a bucket of butter cream frosting and got about 100 mini-cakes filled and frosted {by piping on the frosting}.  

That was my other point, don't try to frost these babies smooth.  My first test run of frosting 12 took about 2 hours to get the frosting smooth on all the layers of all the cakes like I would a big cake.  If I get a little time in the next week I will show you close up the best ways I found to frost these mini cakes.

Anyway, no matter how much work the cakes were, I would do it all again for these two!  I love them both completely.  Little Brother did a great job picking a wife.

Can I tell you how it warms my heart to see my little brother with such a happy grin on his face.  Seriously.  Great.  There go the water works again!  
I will be back soon with more wedding pics.
Have a great weekend :0}

Wednesday, February 8, 2012

ToolBox Tuesday: Wide Mouth Half Pints


I hosted Bunco the other night and wanted a special treat for my guests.  I saw this post on Pinterest about making cheesecake in a jar and thought it would be so cute to have individual cheesecakes for all the ladies.  After searching a while I found these Wide Mouth Half Pint jars on Amazon for about $16.00.  I thought that was a little high for jars, and after reading through the reviews, I saw one person suggested getting the jars from Ace Hardware online.  I went there and they didn't have any available, but I called our local Ace and they were able to order them no problem.  My jars arrived in three days, just in time :0)

The post I saw was for no-bake cheesecakes.  I decided to used my own favorite recipes for baked cakes and was thrilled with how they turned out.

Here is the recipe for the crust:
2c. finely ground graham cracker crumbs
2tsp. sugar
1 stick melted butter

I wasn't sure how much of the crust mixture to put in each jar so I grabbed my TBS and began dropping the mixture in jars by the spoonful.  Turns out, I was able to get 2 packed TBS in each of the 12 jars, even!  Score!

I used a glass cup to flatten out the crust in the bottom of the jar.

Here is where I went wrong.  I didn't realize until I ate one of these cute little treats that by crushing the crust up the sides too made the bottom too thin.  I would recommend just smooshing it in the bottom and not up the sides :0)  The things you find out when you experiment in the kitchen!

Do that to all of the jars and set aside.  

Its time to mix the filling.  I used Chantal's recipe from Allrecipies.com.  It is my absolute favorite cheesecake recipe.  I usually make it in a 9x13 pan so we can have bar-style pieces, but it also worked fabulously for my jars.  **note:be sure to have all your ingredients at room temperature before you start**

I kept filling the jars until the filling was all gone.  I ended up filling the jars until the cream cheese mixture is about 1/4" from the top.  

Once all of the jars were filled, I placed them on a cookie sheet with a rim, placed it in a pre-heated oven, and then added a couple cups of water for a water bath.  
I baked these cuties at 350 for 25min.  I would probably just set the timer for 35 next time.  When the timer goes off, take the cheesecakes out of the oven,   let cool for about 30 min. on a cooling rack, then place in fridge for 6 hours or more until totally cooled.

Ummm...In my Bunco madness I did not get pictures of the final product, but they were fabulous!  I had strawberries or fudge and caramel for turtle cheesecake.  I also made hot fudge pudding cake in a second box of jars, but that will have to be a post for another day.  One great benefit of the cute, little jars was that the ladies could screw the lid on and take their desert with them if they had to roll and run.

So, here are a few more ideas I found that would be great baked into jars...
Cobbler baked in Jars

Madison's Cutie Pies-yep, from The Sew*CakeMakers :0) 


So here is a thought, why couldn't you make just about anything you bake in individual servings in a jar???
I was actually obsessed with the idea last summer while on vacation with my friend Wendi and her 6 kids.  We were constantly trying to figure out how to eat as cheap as possible while out touring local attractions.  We didn't have jars with us, but it was certainly a thought as far as packing a lunch that would be better for us  than the fast food alternatives.  Jars are also a great alternative for storing leftovers.  You aren't supposed to microwave the plastic containers, but these glass jars can just be thrown into the microwave to heat up your food{after you take the metal lid off} 

Here are a couple different jars I found in my search...
The classic half-pint {bought mine at ACE for $10.99/dozen}

The deluxe half-pints {I saw these at Walmart 4 for $7}


and these super cute Tulip Jars {most expensive of all}

Anyway, put something yummy inside, tie it with a cute ribbon or bow, you have a fabulous treat for yourself or someone special!

Friday, January 28, 2011

Very Sorry Attempt at CupCake Pops

I probably shouldn’t even show you these, but they took forever so I say it counts :0)  Honestly, the only cake pops I have really gotten to work were the ice cream cones- DARLING!!!  We started with very good intentions, then lost it all to time crunch.  I am getting a little sick of cake balls, so lately I have been using my Peanut Butter BonBons to represent the ball portion :0)


We patted down the BonBon recipe-yes I triple washed my hands :0)  Using a flower cookie cutter we cut out the bottoms and threw them in the freezer to harden.  You should note that Bakerella says to put them in the fridge-I am a rebel!  When they were cold, we dipped the sucker sticks in almond bark and stabbed the poor unsuspecting flowers, then threw them back in the freezer to set.


I use my recipe for Buckeye Balls as the cake part of the cupcake.  Both of those recipes can be found Here on my blog.  Now, if you notice, the top of a cupcake is not perfectly round.  We rolled those Buckeye Balls, then squished them a little on the freezer paper so they would look anatomically correct.

Here is the train wreck in a as few words as possible:  Dipped bonbons...stuck buckeyes on fresh chocolate...tried to keep balls from falling off...stood cupcakes on head hoping would help...tried to freeze again...What!?! Time to go!?!...Hurry! Dip in white almond bark...first ones very drippy...looks nothing like cupcake...forget it, just dip and go!!!  Oh, lets put M&Ms on top to see if it helps... Oh well, get in the car!  We can't get to the surprise party after the birthday girl!


The girls had fun making them even though mom went a little loopy and threatened to start swearing at the next ill-formed ball.  They seemed to think they tasted good too.

Happy 30th Birthday!!!  You don't look a day over 25.  
Now close your eyes and taste one of my cupcakes :0)

Thursday, January 6, 2011

For My Birthday

So, my birthday was last week, and while this has very little to do with crafts,
I LOVE my new Waffle Cone Maker and wanted to show it off. 
My darling husband has known I wanted a waffle cone maker for YEARS and
decided to spoil me with my very own. 
He found it on Amazon.  If anyone asks, you heard it somewhere else, they run about $50 (the main reason we have not owned one up until this week).  
 Amazon also sells a darling maker that makes 4 mini waffle cones-next year’s list :0) 
He also got a package of mix, around $14 on Amazon, but the maker comes with recipes if you want to make your own.

We swiftly set about using the little machine.  I made my first waffle and couldn't help but try a bowl.  I have some small ceramic bowls.  I laid the waffle on top of one bowl, then pressed another bowl-same size- on top.  Here is what I got...
Will ya look at that!  Someone trying to swipe my waffle bowl before I can even take a picture!!!
That would be the 2 yr old.  Who can blame her :0)

Here, here is a picture... 
I am so amazed at how easy it is to make one of these!  They turned out GREAT and taste even better!

Next up was to make the actual cone.  It has been said that the cones are very difficult to make.  I did a fairly good job on the first, the second had a little bit of a hole at the bottom.  I have found the included directions for rolling very useful.  You are supposed to lay the fresh, hot waffle on a kitchen towel.  Line the wide end of the forming cone with the outside edge of the waffle.  Use the towel as a hot pad when rolling the waffle around the cone.  Then pinch the pointy end of the waffle to make a seal.  

Finished product... 
What the!?!  Fingers again!!!  This time the 9yr old!  No eating 'til Mommy gets her PICTURES!!!

There.  That is better.  Yumm.  You know, this reminds me, I haven't had one yet today...
I have something very...er...uh...important to do :0)
Gotta Go!  Bye!!!

Novelty Print Quilt Pattern

I have had a hard time finding good quilt patterns for novelty prints the past couple times I purchased them.  I made up this pattern so tha...