Wednesday, August 15, 2012

Easy Peasy Fondant Ruffles

Check out this fondant cake I recently made for a baby shower.  I was simply DYING to make a ruffle cake and the baby shower was the perfect excuse.

Here is how you do it....
Roll your fondant to about 3/16" {just thinner than 1/4" thick}
Cut out circles.  I used a 4" circle cookie cutter, but you could use just about any size.  I picked a larger cutter so that my ruffles were longer and I didn't have to make quite as many as if I used a smaller cutter.  

***tip:  I have mentioned this before, but it is so awesome I cannot resist repeating...Buy a yard of vinyl from the fabric store and use that to work your fondant.  I put the vinyl down on the counter, blop my wad of fondant on top, then fold the second half of the vinyl piece over the top loosely so that I have a giant vinyl/fondant/vinyl sandwich.  Then you could roll out your fondant without using ANY powdered sugar, extra grease, or anything!!!  It keeps your fondant super pliable and moist unlike powder sugar.  Fabulous!  {also a great way to keep your circles from drying out while they wait to be ruffled...just cover them with the top flap of vinyl and press it down lightly to keep the air out!!!}

OK, so I bought a big set of fondant tools, but these two are all you need...one foamy square {flat foam not the big spongy one} and a wooden dowel that has a rounded end.  Put one fondant circle on top of the foam and then press your dowel into the fondant about an inch.  Apply light pressure and roll the dowel back and forth to get the fondant ruffling.

It will start to look like this.  If yours doesn't, you might need to press a little harder, or perhaps, a little lighter.  Just roll the dowel in short spans.  Did I mention that while this technique is easy, it takes a LONG TIME :0}  I may have left that fact out.  Work your way around the fondant circle, stopping to turn the circle as you go.  Eventually you will end up with this... 
I started to cut with the smaller cookie cutter in the center before I realized I needed a picture.  You won't have that circle there :0)  Please note the rough edge on the right side.  That started happening because the fondant was sticking to my wooden dowel.  If that happens to you, stop, go wash your dowel and dry it thoroughly, then if need be, rub it with a light coating of Crisco or shortening.  That should do the job and you can continue on to the next ruffle.

NOW use the smaller cookie cutter to cut out the center.  If you have a local bakery supply store these circle cookie cutters can be purchased for less than a $1!  You can check Amazon too.  They are a fabulous resource for cake makers, tons of supplies for cheap!  My favorite!!!

OK, so when you have a ruffle ring like this, cut it apart.  I used a nearby fondant tool, but for heavens sake, a butter knife will do splendidly.  Take note of the vinyl edge there at the top left of this picture.  It may be hard to tell, but all of this fondant work was done on top of my fondant vinyl piece :0)  It is also a great way to keep your counter tops clean.

Here is your basic strand of ruffle.  As you straighten out the circle the fondant ruffles even more.  You cannot get the full ruffle effect by using a straight piece of fondant!  You have to use circles to get the fullest ruffles.  A tighter circle will actually give you more ruffle than this bigger circle I used.

I like to smoosh the fondant thinner so it is ready to be "glued" to the cake.

My "glue" of choice is good old corn syrup.  You can spend more for official fondant paste at the cake store, but I have not had an issue with the corn syrup.  Do you like how I give "to much information" at each and every step?  I am just trying to be thorough for anyone out there that might a big a freak about details like I am :0}

I use a paintbrush {reserved only for cakes} to apply the corn syrup where I want the ruffle to go on the cake.

Apply the ruffle and smooth the seams together.  I like to fold under the edge of the new ruffle before I glue it down.  That way the previous ruffle edge is covered and when the layers are done, you cannot find the seams.

One thing that perplexes me about the whole ruffle trend, is how to finish the top.  This time I decided to try the puckered-fondant-sash-thing found at this site.  If you stand back a little and look, it kinda looks like a banquet table.  I added the brown buttons because the mamma-to-be loves pink and brown together.

Here is a closer look at the top.  I cut another circle from white fondant, free-handed a monogram with my knife, then painted it with corn syrup and added the edible pearls.  I am a total sucker for rolled flowers and couldn't resist adding a couple of those for accent.

Here is my finished cake.  So totally precious!  I am thrilled at how it turned out.

For a little added sweetness... 
I threw in a couple dozen of my Oreo cupcakes and Oreo cheesecakes. 

With no oven in our current hotel home, I have found other things to fill my crafting needs.  Recently I have been working hard on some new printables.  Come back in the next couple days to check those out!!!


Sunday, August 12, 2012

Party for ONE!


Here are some pictures I took of a DARLING little one year old.  Little Brecken is one of my favorite subjects :0)

Check out his eyes!  Aren't they striking!?!
What a handsome little guy :0D

Nothing better to bring on smiles than a hearty game of Peek-A-Boo! 


This was my first Smash Cake experience.
Brecken's mamma set the cake down in front of the boy and we prepared ourselves for the mayhem.   

I have to say he was a little too tidy for my liking :0}

Brecken was so cute.  He would eat a little bit, then stop, look at his mom, and make the sign for more.  What a polite little 1yr old, asking his mom if he could keep eating his own cake :0)

Super fun!  Thanks Brecken and thanks to his mommy for letting me take his pictures!

Cushioned Bucket Seat

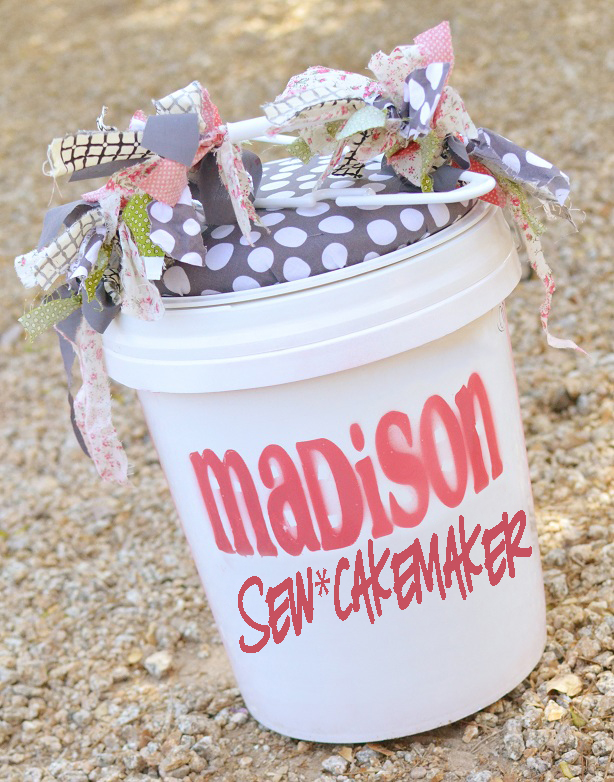
Many a months ago I made some old buckets into playroom chairs for my Emmers.  This summer I made a new bucket into a cushioned chair for my big girl Madison.  Each kid on her pioneer reenactment was allowed only one 5gal bucket for their belongings.  The bucket was also to act as their chair whenever the kids were allowed a chance to sit down.  I figured if they were going to pull a handcart 20 miles Madison might as well have a soft place to sit. 
Here is how I made the round bucket cushion.

Essentially, you need to make a cushion, then attach it to a bucket lid.  I started by tracing a template of the inside of this lid, then cutting the template circle out of 1" pine. 
 I used 1" thick wood instead of a thinner, lighter piece for only one reason- I had 3/4 " screws to screw the two pieces together and if I had used thinner wood the screws would have poked through the wood and made the chair rather uncomfortable.
enough said

Next problem, the edge would be rather uncomfortable on the legs of my exhausted girly, SOoooOOooo, they need to be sanded down.

Here is the 1" wood after a trip to the disk sander.

Much smoother edge.  Now that we have a base, it is time to upholster!

I saved the cushions off an old couch before we got rid of it.  Can I just say that it was a fabulous idea!  I have found 5 or 6 uses for the foam inside those two cushions.  Here is one!  There happened to be a thin, like 1/2" layer of foam under the 2" layer of batting.  I just plopped my wooden base circle on top, traced it onto the foam, then moved the wood and used my rotary cutter to cut the foam/batting out.

OK, here is what I used to make the seat: bucket lid, wood insert, foam/batting topper, scrap fabric for a base layer of fabric, then the top fabric.  For super detailed instructions on how I put the layers together, step by step, you can check out my other post HERE.  Otherwise, here is the rundown...

Hot glue the foam to the wood circle.  Lay the wood/foam on top of the scrap fabric, foam side down, right in the middle of the fabric.  Pull one edge of the scrap fabric over wood, staple in place.  Pull the scrap over the wood on the opposite side of the circle.  Staple.  Now grab the scrap in the 3 o'clock position over and staple it to the wood.  Do the 9 o'clock position next.  Work around the seat in that type of fashion, staple halfway between two staples, then do the opposite side until the whole piece of fabric is pulled tight and secured with staples on the wood side.  Now grab the top piece of fabric and do the exact same thing.  When you have all the fabric on there, trim all the extra fabric off and you are ready to screw the seat to the lid.  In the end, my husband decided we needed to use a screw-top lid instead of the top shown above.  If you don't know what I am talking about, they look like this:
I found this picture and listing on Amazon
By using the screw-on lid, the seat was a little easier to get into.  We were having a little trouble getting the lid to stay on before, but with the screw-on lid, the threads held the lid in place.
I LOVE these lids, called Gamma Seal lids {just in case you were wondering}.

There you have it!  We took some of the scrap fabric from her pioneer clothes and added them to the handles for a little more "Madison"ness.

Here is my girly on the Saturday before Trek.  We had to bring all of her stuff to an inspection.  All of the kids were given a list of "allowed" items and their buckets were inspected to make sure there was no contraband.  

I promised a closer look at the clothes I made for Trek.  Sadly, with all of our moving I just wasn't able to take better pictures.  Here you can see the ruched green skirt, bonnet, and white shirt I made.  Madison also insisted on the ruffle underskirt I tempted her with.  I started making it, then imagined how hot and heavy the skirt would be.  My daughter, the everlasting fashion diva, continued to insist on all the ruffles even with all my warning.  She wore the thing the entire three day hike too!

 Madison picked fabric to make matching aprons for both of her allowed outfits, but then we got home and realized she was only allowed one apron.  There is a way around everything!  We made this apron reversible.  You can see the other side a few pictures down.

Here is my cute girly just before we said goodbye.  Breaks my heart all over again!

Here are a few of the other folks around that early morning.

Don't they all look cute in their pioneer clothes!?!  I loved seeing all those boys dressed up in their suspenders and such.   

There goes my Maddie Girl.  Totally fearful and unaware of the incredible experience that awaited her.  

Here is Madison in her other pioneer outfit.  I made the grey shirt and pink flowered skirt with ruffles.  You can see the pink side of the apron that matches her pink bonnet.  It was kinda lucky that she had a second bonnet because there was a girl there without one.  Madison was able to loan out her spare and keep one more head out of the sunlight.  In the handcart you can see that the bucket seat{well worn} made it triumphantly through the Trek.  What a fabulous experience for my girl.  She was tried and tested to her limit, then came home knowing that 
She CAN do Hard Things!
{But she didn't have to sit on one :0}


Saturday, August 11, 2012

Baby Bottle Cake Pops

HELLO!
I have missed you all so much :0J
We have had quite an adventure in Sioux Falls, SD this past two weeks.  Let me just say that finding a house to rent here is IMPOSSIBLE!
That said, I have had very little time to craft, and since most of my free time has been spent bawling my eyes out, I will take a couple days and post some projects I missed getting on the blog before we left Phoenix.

Here are my secrets about how I made Baby Bottle Cake PoPs...
Candy toppers!  These were made with lifesaver gummies and then {because it was what I had on hand} Hot Tamales.  I think I would have used Mike n' Ikes....but that would have required another trip to the store.  Not sure the fruity life savers, cinnamon hot tamales, and the Oreo cake pops all went together, but that is what happens when you ask a busy friend to make treats for your baby shower ;0}

Go ahead and stick the candies together before you start on the pops.  The hot tamales just stick right into the life savers. Doing it ahead of time will make the rest go a lot smoother.

K, so basic Oreo truffles here...used my cookie scoop to make 2Tbs balls of dough, then shaped them into cylinders like this.

Cut a stack of paper straws in half, then one at a time, dip one end into melted chocolate and insert it into the Oreo cake ball.  

You know these are actually cookie balls, right?  I have just always called them cake balls, so that is what we call them here in Sew*CakeMaker land.

Put those in the fridge until they are cold.  Next, dip just the Oreo part into white chocolate.  I like to place them into my cake pop stand to cool, then while the chocolate is still wet, place a prepared candy topper on top. 

Here is my group of bottles waiting for the last step.

Melt the nipple color of your choice and dip just until the candy topper is covered.  I like to slowly turn the bottle around making sure there aren't any holes in the chocolate.  Keep turning just a minute until you are sure the chocolate won't drip down into the white part.  I tried to draw measurement lines on the bottles, but it just looked weird, so I recommend taking the simpler road here and leave them just like this.
Ta-daH!
Super cute treats for the mommy to be or any self-respecting baby shower!
Love it!


So, going to bed now, but I will be back with pages of things to show you.  I totally forgot how busy the last couple of months have been until I flipped through the pictures again ;0)


Novelty Print Quilt Pattern

I have had a hard time finding good quilt patterns for novelty prints the past couple times I purchased them.  I made up this pattern so tha...