Sunday, November 13, 2011

Friday Night Craft Party

My back has been out the last two weeks.  I finally started having relief and feeling better, so why not have a ridiculously good time crafting with friends!?!  
I made up a pattern for Christmas Gifts and a Tree Trio and started writing names of people to invite.  I won't even tell you how long that list was, but I will tell you that I only invited the first 15 people and the rest of you will have to wait until Friday Night Craft Party the Second :0)  It is coming!

So here are pictures of the crafts made by my fabulous friends...the crafts I remembered to take pictures of :0)  You know me, a little too involved to remember to snap pictures.  I did take pictures of everyone crafting, then decided my house in the background was far to messy to show off online.  Therefore, these pictures are all you get!!!  Jennifer was the first one to finish her presents.  I was cutting wood all day long and didn't manage to get samples painted before the party.  Thank goodness Jennifer finished hers so everyone else could get excited about their projects.

Here is one set of the tree trio.  Chirstina painted them up and decorated them with ribbons and such.  I think I need to make the blocks different sizes and then wrap them up like presents.  I think that would be super cute.  

She also made this pumpkin.  It was the same pattern I used for Super Saturday, then Christina added the pattern paper to spice things up.

Brittany made these darling present.  All the presents were cut out of 2" wood on my band saw.  I LOVE my bandsaw.  You cannot cut a large amount of 2" wood on a scroll saw.  In fact, while you can cut 2" wood on the scroll saw, the few times I have tried it has about driven me to tears for the long time it takes and the fretting and stewing over if the saw will live through the trauma.  Save some trouble and look up Grizzly Band Saws.  You get all the power of Jet, but half the price!!! 
Enough of the sales pitch... 

We did the 2x4 pumpkins.  This one was made by Lindsey.  We had 2x4 trees to make also, again, no picture.

I am throwing this picture into the mix for the mere reason that I cut out seven of these trees...not at all easy... and I didn't get a single picture of any of the trees made at my house Friday night!
The trees were the whole reason why I had to squeeze this craft night in before Thanksgiving.  Actually, it is because I gave every last tree away at Super Saturday and I needed to make them again so I could keep one for myself :0)  Whatever the case, we made trees too.

Lindsey's presents turned out fabulously.  She managed to make two sets and the pumpkin all in the same night!  Wohoo Lindsey!  You win the Super Crafter award for the evening!
Keep an eye out.  I will be doing Friday Night Craft Party version 2.0 very soon and have another craft to add to the mix.
Happy Holidays Everyone!!!

Saturday, November 12, 2011

Dress a Girl Around the World

I had a fabulous time helping the youth of our church this past Saturday make dresses for little girls in Africa.  The organization Dress a Girl Around The World is working to clothe and, by doing so, protect girls in Africa.  Our group of over 200 youth, very inexperienced with a sewing machine, worked together to make over 150 pillowcase dresses for the cause.

I helped teens make bias tape.  How many of you have ever made your own bias tape?
Yuck!  Not my favorite job.  These guys were fabulous.  I was so honored to work with such a great group of teens.  The whole day, from 9am to 4pm, I never heard one person utter a negative word.  Amazed.

These kids were so excited and fully devoted to the cause.

Tons of people donated supplies like pillowcases and ribbon.

The kids did every step of the dress-making process.  They cut the top off the pillow case, cut the extra length into 2" strips for bias tape for the arm holes.  They cut the arm holes, ironed the bias tape, and sewed it in place.  They ironed and sewed the casing for the ribbon, and then ran it through the tops.  The ribbon was stitched in place by a couple youth and then the dresses that had been finished were hung around the cultural hall for everyone attending the Youth Conference to see.

Many adults devoted their whole day, plus the use of their own personal sewing machines, for these beginners sewers to use.  I missed the picture of all the kids swarming around the machines.  These are just the adults at work between group changes.  

You wouldn't believe how many boys...ahem...Men there were making dresses with a smile on their faces.  My last group through the bias tape making station I had these two big football-y boys standing at the ironing board, folding and ironing fabric for bias tape.  They were so focused on making a perfect strip I just had to laugh at the irony {there's a double meaning in that :0}
They worked away the time and never seemed to give a second though about the work.  I teased them that now they were qualified to do the ironing at home.  That comment was quickly disputed, sorry moms! 

When we had the whole activity cleaned up I ran into the cultural hall for a last peek at our day's efforts.  
WOW!
To see the whole HUGE room Lined with dresses, all different sizes and colors, made with love by our youth for children in need...No words...totally heart warming.
What a great day :0)

Friday, November 11, 2011

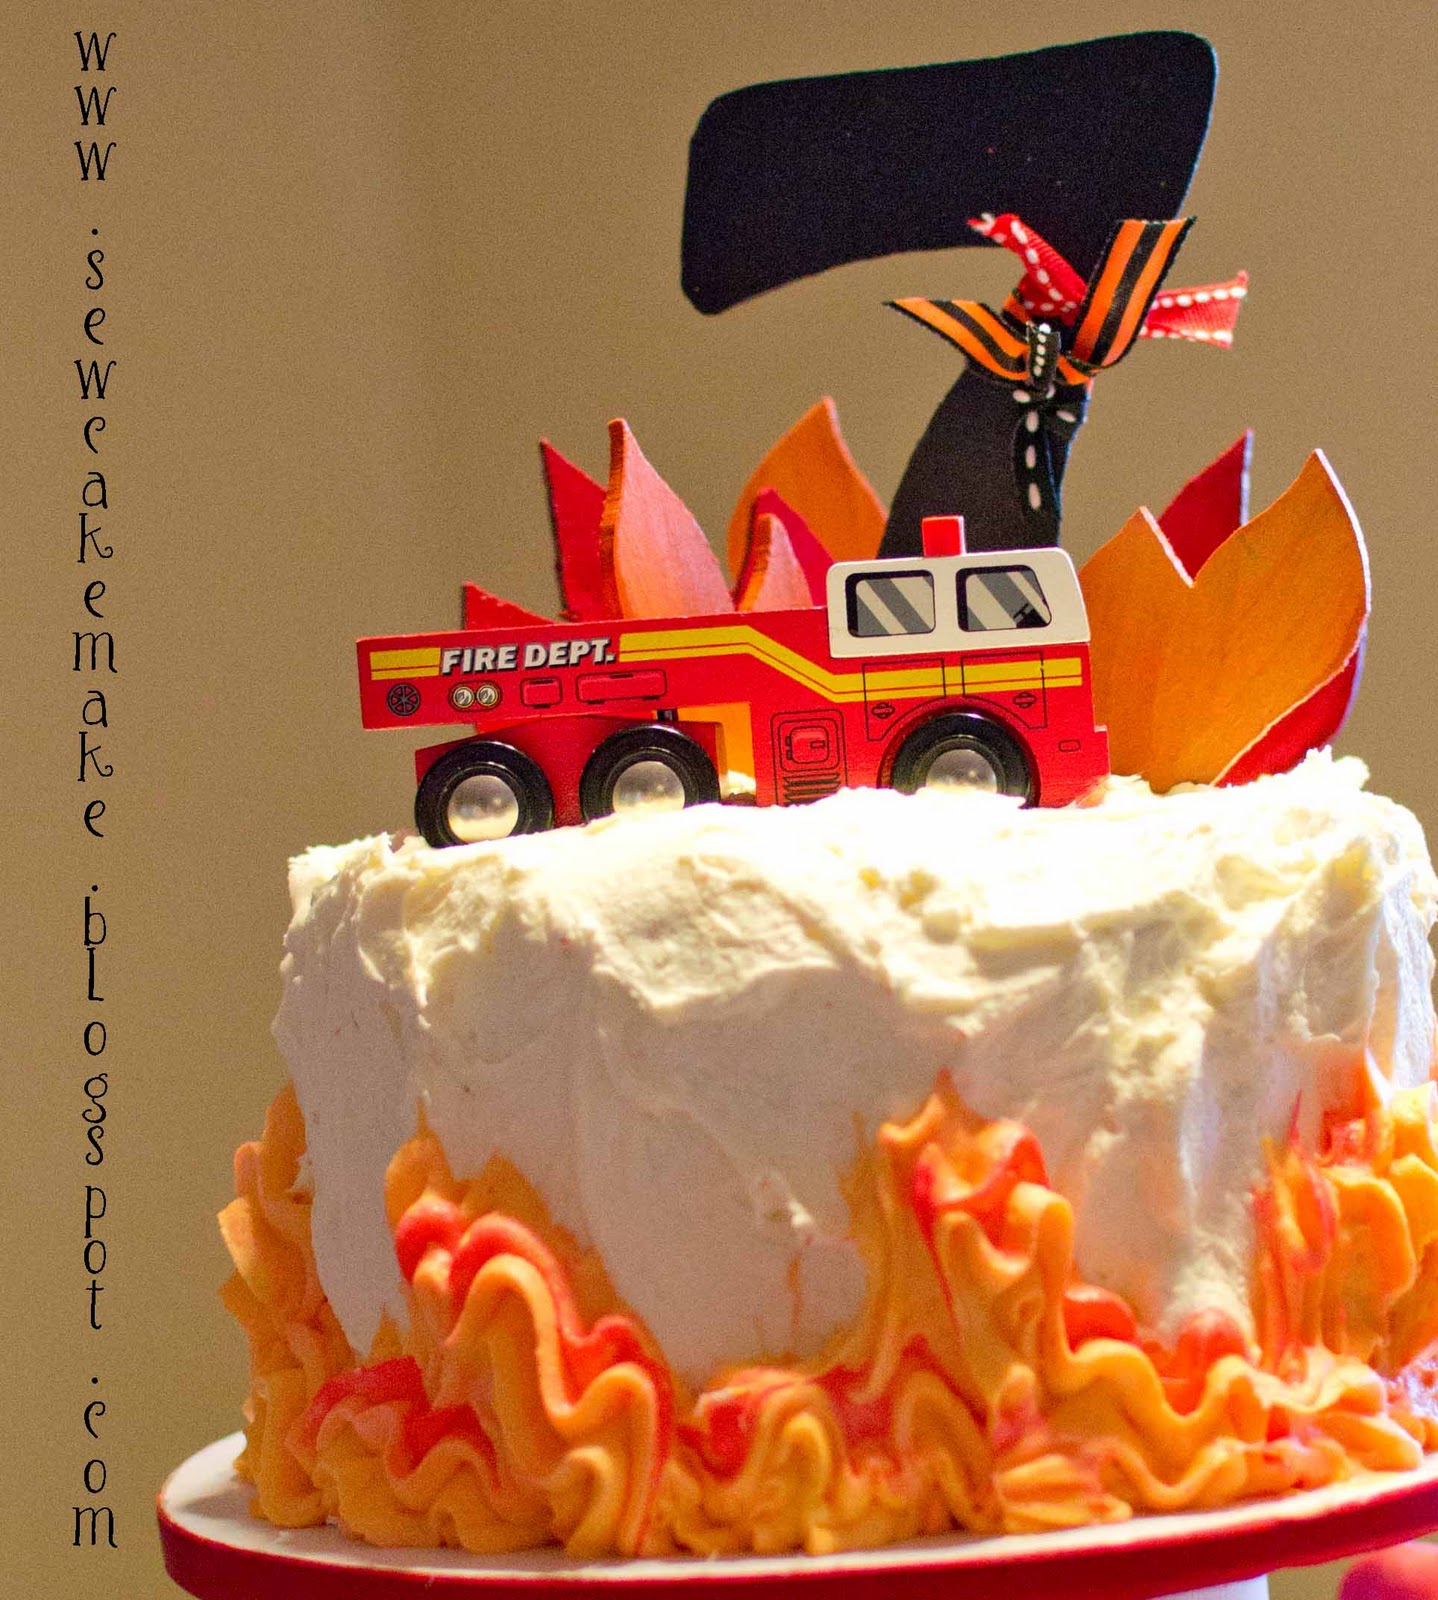
Fire Truck Birthday Cake

I made a quick FireMan cupcake tower for a friend the other day.  Her son was turning seven and they had hired a Fire Truck to come to the house and give the kids an up close birthday experience *Totally FUN*

I went with my strawberry jello cake with whipped white chocolate cream cheese frosting for the cake.  Trying to keep thing simple, I purchased the wooden fire truck from Target for $3 {What a bargain!} and cut the "7" and the flames out of 1/8" wood on my saw.  

In the middle of the night it hit me that I should make fire hydrants!!!  Here is the naked truth :0)  
We took the tops off of Oreos and only used the frosted sides. I put a dab of melted chocolate on the cookie icing, then plopped on a big marshmallow.  Dab of more chocolate, then another cookie, icing side first.  On top of our ridiculously large marshmallow-Oreo sandwich I added a slice of marshmallow {cut a marshmallow into 4 equally thick slices} and topped it off with a marshmallow pumpkin {which had also been trimmed-about 1/3 of the bottom taken off with my kitchen scissors}.
A couple cheerios were added for the nozzles and it was time to dip!

Let me just tell you right now that this kind of dipping is not for the faint of heart :0)
I ended up shoving a BBQ skewer into the backside of each poor little fire hydrant so that I could fish them out of the bowl.  I would have made them pops on sticks, but couldn't think of a cookie that had a hole in the middle that a stick could be shoved through.  

Anyway, dip in melted chocolate, tap on the side of the bowl to get excess chocolate off, then set on wax paper to dry.

Not every hydrant was stellar, but they were sure cute and a fun addition to the cake stand.  We also make the helmets on the cupcakes in the same fashion as the hydrant tops.  The brim is the top of the Oreo earlier rejected in the hydrant production, marshmallow slice, then finished off with a shortened marshmallow pumpkin.  We added the little emblem cut out of fondant to the front of the hat for accent.

Madison thought the frosting needed to be orange.  At first I looked at her like she was crazy, but then it made sense, like fire!  Momma is a little slow these days.  I colored the bag with red icing color before loading it with orange icing, then frosted the cupcakes.  Madison also thought the cupcakes needed more red so she added the red ballies...I forget what they are called.

ANyway, the kids had a great time at the party, and I had a great time making the cake!
How cute is that picture?!?!
What a great idea!  A fire truck birthday company.  Why didn't I think of that!!!

Tuesday, November 8, 2011

Tie One On :0)

I made this cute apron for Emmalee's best little friend, for her birthday.  It was such a fun and easy project I may just add a few to my Christmas Gift list this year.  
I used the free little orange aprons from Home Depot as my guide.  My children are abnormally tall for their age and I wanted to make sure the apron would not be too big for our little girlfriend.  I used that orange apron as my cutting guide and cut out the apron shape from a black piece of duck cloth, or canvas, that I had left over from another project.  

I marked the lines for the ruffles, and then used my ruffler foot to sew the ruffles directly to the apron.  For the solid pink bib part, I sewed the fabric, face down over the top ruffle salvage, then flapped it open and ironed it to the top of the canvas with heat-n-bond between the two fabrics.  I sewed bias tape along the top and bottom edges of the canvas to keep it from unraveling, then ran bias tape along the sides so that the canvas side and all fabric edges were encased to prevent any fraying.  It is so simple to do the edge this way, because you can take the bias tape up one side, keep sewing the bias tape for the neck strap, then just slide the tape over the fabric at the top of the other side and travel on down.  When you are finished you have a completely trimmed apron and you already have a neck strap!  Fabulous!  I attached two more lengths of bias tape that had been sewn shut to the sides, to tie the apron on.  The only trim-ish thing I could find in my stash was half a zipper, so that became the decoration between the ruffles and the bib.  

Keeping with typical embellishment, I made some rolled flowers and a bow for the waist line as well.

I was stenciling my Halloween bags at the same time, so I decided to just stencil the monogram on the front as well.  I thought about using heat-n-bond and fabric to make the letter...but let's face it, I was too lazy to sew around the whole monogram.  A much cuter letter can be done by stencil for WAY less effort.  I did give the monogram two coats of black acrylic paint, just the same stuff I use for my woodcrafts, and then added some more flowers when the paint had dried.  

For just a little more frill, I tied a couple strips of scrap fabric to the neck strap and called it good!
I will admit it was a little hard to give this project up {totally Loved it} but it was sure fun to see our best little friend tie it on :0)
It also made me wish I could Tie One On.  Guess I better make an apron for myself, with all that fashionable holiday baking soon to be had.  I need to feel a little more like June Cleaver and I'm pretty sure a ruffle apron would be the key :0)

Thursday, November 3, 2011

Mr. Turkey Lurkey

I believe in Cloning when it comes to animals of the Wooden variety.
I stole this handsome devil from my friend so I could examine and perform a little CopyCatting later.  Mr. Turkey Lurkey is probably the cutest turkey I have ever seen.  He is made completely of 1" pine.

My friend bought him years ago at Quilted Bear in Salt Lake City, Utah.  Whoever made him is totally talented and came up with an adorable design.  I love the face.  Googly eyes are my favorite.

Hands...

Love the sign!  I am thinking of a sitting version of this guy, but the feet are pretty cute too.  I am loving the knobby knees :0)

Just in case you are a visual person and like to see how things are put together, I have included a shot of the business end of things.... 
How Embarrassing!

Here, we won't leave with that shot...
There.  That's better.
I hope there is Gobble in your Wobble this Thanksgiving season!
I also hope this guy's brother will soon be on my porch :0)
Have a great day!

Tuesday, November 1, 2011

Trick-or-Treat Bags

Who can go begging for candy without a trick-or-treat bag???  
I finally got around to making some new ones for my kids this year.  

I wanted the girl bags girly, and the boy bag not.  That was why I went with a glorified pillowcase type for Eli.  

I sewed the orange spider web fabric as a liner and the top band, then glued spider buttons here and there for accent.  To do the lettering, I cut a stencil on my Silhouette Electronic Cutter, then used white paint to stipple the letters on the fabric.  It took two coats, but was still the easiest way I could think to letter without having to top stitch something.  I lined the letters with a sharpie permanent marker to make them stand out a little more.  The handles were not sewn on traditionally.  I put them on the sides to make holding the candy bag out for treats a little easier.  I had already put the handles on the girl's bags unfortunately, otherwise I would have done their handles the same way.  It really was nice while trick or treating.

I made the girls the same bag, just switched the orange fabrics so we could tell each candy stash apart.  I used a scrap of black canvas I had left over and just stitched the ruffles directly to it. 

Now that I have experienced the beauty of store-bought handles, I will NEVER go back to fabric straps.  I grabbed these purses from Goodwill on half-priced Saturday for $2.50 each bag.  By cutting the handles off these purses, each handle was $1.25 rather than the staggering price from the craft store, as much as $10 a strap.  Plus, we recycled :0)  Now I can claim a "Green Halloween" right?

The straps were attached, then jazzed up a bit with a few fabric scraps and a spider button.

Little Emmalee Hello Kitty got the bag with the shorter handles.  I added rolled flowers to the sides along with more spider and bat buttons.

My one thing I would have done differently, besides the handles on the sides, is I would have used a thinner font and put the rolled flowers up on the black yolk more and less on the ruffles.  I didn't realize until it was time to glue on flowers that there wasn't enough room around the words and that the flowers would have to go lower.  I guess I shouldn't be telling you this though.  I should just give you the illusion that everything went just as planned, huh :0)


Halloween was totally fun this year.  I was worried with how crazy things always were that we wouldn't be able to enjoy the season.  We still crammed in pumpkin carving, parties and treats... 
Madison made these cake balls herself.  They were a Halloween treat for her teachers.

Smiles were had all around...especially with the buckets and buckets of candy the kids came home with.
Now I say, "Eat all you want kids.  Tomorrow I am sending what's left to work with Dad!!!"

Novelty Print Quilt Pattern

I have had a hard time finding good quilt patterns for novelty prints the past couple times I purchased them.  I made up this pattern so tha...